Home
General
Staff
Contact
Partners
Alumni
Research
Areas
Projects
Papers
Books
Reports
Awards
Teaching
Lectures
Exams
B.Projects
M.Theses
PhD Theses
Go Abroad
Misc
Talks
Library
Gallery
Links
Search
Webmaster
|
Introduction
If you have to create a graphical user interface it is a possibility to snap evey control to a fix location.
Usually this is not a good idea, most of the time you have to write an event handler which adopts
the locations and sizes of your controls. Here the idea of a layout manager takes place,
a layout manager provides a solution for standard scenario.
Because .NET (dotnet) only provides the possibility to dock and anchor a control, but no possibility to
put controls in standardized grids or automaticaly resize every control proportional, I implemented
this layout manager framework. This framework consists of a layout control which is derived form
System.Windows.Forms.Control. If you like to use this layout manager you have to use this
control as container for your controls.
In order to use a layout manager your first create an instance of that layout manager and than
assign it (at creation time) to an instance of LayoutManager.LayoutControl.
...
LayoutManager.ILayoutManager layout = new SomeLayoutManager();
LayoutManager.LayoutControl control = new LayoutManager.LayoutControl(layout);
...
|
Now you can work with the Control in the familiar way.
...
control.Controls.Add(fooControl);
...
|
If you like to change the layout manager of an LayoutControl later on,
you can do so via the "Manager" propery.
...
control.Manager = new SomeOtherLayoutManager();
...
|
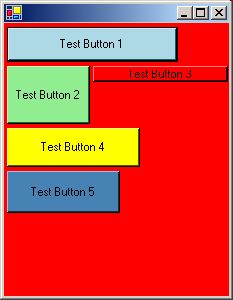
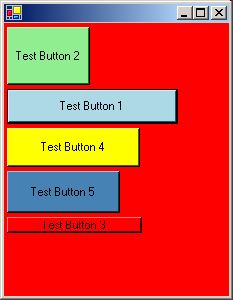
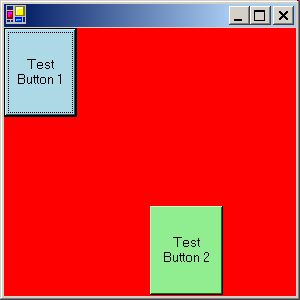
FlowLayout is a simple left to right and top to bottom layout.
You can sort the controls either by insertion order (default; TabOrder = false)
or by TabIndex (TabOrder = true).
To use it you have to create a LayoutControl using a FlowLayout object.
...
LayoutManager.LayoutControl control = new LayoutManager.LayoutControl(new LayoutManager.FlowLayout());
...
|
Then choose the size of the control.
control.Size = new Size(100, 100);
|
Now you can add controls as you like.
...
myLabel = new Label();
myLabel.Size = new Size(50, 25);
panle.Controls.Add(myLabel);
...
|
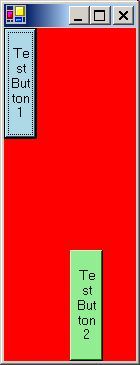
If you alter the size of the control now, the position of the controls will be readjusted.
Example:
| Source Code Download | Result | Resized Window |
/*
Copyright (c) 2003 Markus Loeberbauer

Permission is hereby granted, free of charge, to any person obtaining a copy
of this software and associated documentation files (the "Software"), to deal
in the Software without restriction, including without limitation the rights
to use, copy, modify, merge, publish, distribute, sublicense, and/or sell
copies of the Software, and to permit persons to whom the Software is
furnished to do so, subject to the following conditions:

The above copyright notice and this permission notice shall be included in
all copies or substantial portions of the Software.

THE SOFTWARE IS PROVIDED "AS IS", WITHOUT WARRANTY OF ANY KIND,
EXPRESS OR IMPLIED, INCLUDING BUT NOT LIMITED TO THE WARRANTIES
OF MERCHANTABILITY, FITNESS FOR A PARTICULAR PURPOSE AND NONINFRINGEMENT.
IN NO EVENT SHALL THE AUTHORS OR COPYRIGHT HOLDERS BE LIABLE FOR ANY CLAIM,
DAMAGES OR OTHER LIABILITY, WHETHER IN AN ACTION OF CONTRACT,
TORT OR OTHERWISE, ARISING FROM, OUT OF OR IN CONNECTION WITH THE SOFTWARE
OR THE USE OR OTHER DEALINGS IN THE SOFTWARE.
*/

/* Author:   Markus Loeberbauer
 * Homepage: http://www.ssw.uni-linz.ac.at/General/Staff/ML/
 * EMail:    Loeberbauer@ssw.jku.at
 * Phone:    + 43-732-2468-7134
 *
 * Compiler: Microsoft .NET Framework 1.1
 * */
using System;
using System.Windows.Forms;
using System.Drawing;

public class Test : Form {
	private LayoutManager.LayoutControl con;
	private LayoutManager.FlowLayout layout;

	private void ClickBtn1(object sender, EventArgs e) {
		layout.TabOrder = !layout.TabOrder;
	}

	public Test() {
		Button btn1 = new Button();
		Button btn2 = new Button();
		Button btn3 = new Button();
		Button btn4 = new Button();
		Button btn5 = new Button();
		Random rnd  = new Random();

		layout = new LayoutManager.FlowLayout(3, 4);

		con = new LayoutManager.LayoutControl(layout);
		con.Size = new Size(600, 400);
		con.Dock = DockStyle.Fill;
		con.BackColor = Color.Red;

		btn1.Text = "Test Button 1";
		btn1.BackColor = Color.LightBlue;
		btn1.Size = new Size(rnd.Next(25, 200), rnd.Next(15, 60));
		btn1.Click += new EventHandler(ClickBtn1);
		btn1.TabIndex = 2;

		con.Controls.Add(btn1);

		btn2.Text = "Test Button 2";
		btn2.BackColor = Color.LightGreen;
		btn2.Size = new Size(rnd.Next(25, 200), rnd.Next(15, 60));
		btn2.TabIndex = 1;
		con.Controls.Add(btn2);

		btn3.Text = "Test Button 3";
		btn3.BackColor = Color.Red;
		btn3.Size = new Size(rnd.Next(25, 200), rnd.Next(15, 60));
		btn3.TabIndex = 5;
		con.Controls.Add(btn3);

		btn4.Text = "Test Button 4";
		btn4.BackColor = Color.Yellow;
		btn4.Size = new Size(rnd.Next(25, 200), rnd.Next(15, 60));
		btn4.TabIndex = 3;
		con.Controls.Add(btn4);

		btn5.Text = "Test Button 5";
		btn5.BackColor = Color.SteelBlue;
		btn5.Size = new Size(rnd.Next(25, 200), rnd.Next(15, 60));
		btn5.TabIndex = 4;
		con.Controls.Add(btn5);

		this.Controls.Add(con);
	}

	public static void Main() {
		Application.Run(new Test());
	}
}
|
 |
|
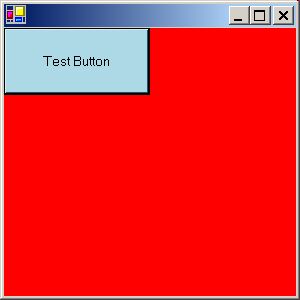
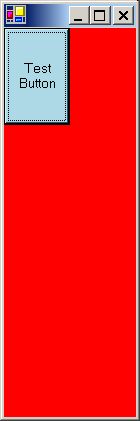
RubberLayout is a simple proportional layout.
To use it you have to create a LayoutControl using a RubberLayout object.
...
LayoutManager.LayoutControl control = new LayoutManager.LayoutControl(new LayoutManager.RubberLayout());
...
|
Then choose the size of the control so that you can place your controls convenient.
control.Size = new Size(100, 100);
|
Now you can add controls as you like.
...
myLabel = new Label();
myLabel.Bounds = new Rectangle(0, 0, 50, 25);
panle.Controls.Add(myLabel);
...
|
If you alter the size of the control now, the label myLabel will always stay in the upper left corner of the control
(position [0, 0]) and occupy half (50/100) its width and a quater of its height (25/100).
Example:
| Source Code Download | Result | Resized Window |
/*
Copyright (c) 2003 Markus Loeberbauer

Permission is hereby granted, free of charge, to any person obtaining a copy
of this software and associated documentation files (the "Software"), to deal
in the Software without restriction, including without limitation the rights
to use, copy, modify, merge, publish, distribute, sublicense, and/or sell
copies of the Software, and to permit persons to whom the Software is
furnished to do so, subject to the following conditions:

The above copyright notice and this permission notice shall be included in
all copies or substantial portions of the Software.

THE SOFTWARE IS PROVIDED "AS IS", WITHOUT WARRANTY OF ANY KIND,
EXPRESS OR IMPLIED, INCLUDING BUT NOT LIMITED TO THE WARRANTIES
OF MERCHANTABILITY, FITNESS FOR A PARTICULAR PURPOSE AND NONINFRINGEMENT.
IN NO EVENT SHALL THE AUTHORS OR COPYRIGHT HOLDERS BE LIABLE FOR ANY CLAIM,
DAMAGES OR OTHER LIABILITY, WHETHER IN AN ACTION OF CONTRACT,
TORT OR OTHERWISE, ARISING FROM, OUT OF OR IN CONNECTION WITH THE SOFTWARE
OR THE USE OR OTHER DEALINGS IN THE SOFTWARE.
*/

/* Author:   Markus Loeberbauer
 * Homepage: http://www.ssw.uni-linz.ac.at/General/Staff/ML/
 * EMail:    Loeberbauer@ssw.jku.at
 * Phone:    + 43-732-2468-7134
 *
 * Compiler: Microsoft .NET Framework 1.1
 * */

using System.Windows.Forms;
using System.Drawing;

public class Test : Form {
	private LayoutManager.LayoutControl con;
	private LayoutManager.ILayoutManager layout;

	public Test() {
		Button btn = new Button();

		layout = new LayoutManager.RubberLayout();
		con = new LayoutManager.LayoutControl(layout);
		con.Size = new Size(100, 100);
		con.Dock = DockStyle.Fill;
		con.BackColor = Color.Red;

		btn.Text = "Test Button";
		btn.Bounds =  new Rectangle(0, 0, 50, 25);
		btn.BackColor = Color.LightBlue;

		con.Controls.Add(btn);

		this.Controls.Add(con);
	}

	public static void Main() {
		Application.Run(new Test());
	}
}
|
 |
 |
GridLayout works with a grid of equidimensional cells, which will be filled row by row.
To add a control to a specific cell in the grid, just use the method GoTo(row, column),
before adding the control.
If you fill a cell more than once, only the last control will be in the cell.
Example:
| Source Code Download | Result | Resized Window |
/*
Copyright (c) 2003 Markus Loeberbauer

Permission is hereby granted, free of charge, to any person obtaining a copy
of this software and associated documentation files (the "Software"), to deal
in the Software without restriction, including without limitation the rights
to use, copy, modify, merge, publish, distribute, sublicense, and/or sell
copies of the Software, and to permit persons to whom the Software is
furnished to do so, subject to the following conditions:

The above copyright notice and this permission notice shall be included in
all copies or substantial portions of the Software.

THE SOFTWARE IS PROVIDED "AS IS", WITHOUT WARRANTY OF ANY KIND,
EXPRESS OR IMPLIED, INCLUDING BUT NOT LIMITED TO THE WARRANTIES
OF MERCHANTABILITY, FITNESS FOR A PARTICULAR PURPOSE AND NONINFRINGEMENT.
IN NO EVENT SHALL THE AUTHORS OR COPYRIGHT HOLDERS BE LIABLE FOR ANY CLAIM,
DAMAGES OR OTHER LIABILITY, WHETHER IN AN ACTION OF CONTRACT,
TORT OR OTHERWISE, ARISING FROM, OUT OF OR IN CONNECTION WITH THE SOFTWARE
OR THE USE OR OTHER DEALINGS IN THE SOFTWARE.
*/

/* Author:   Markus Loeberbauer
 * Homepage: http://www.ssw.uni-linz.ac.at/General/Staff/ML/
 * EMail:    Loeberbauer@ssw.jku.at
 * Phone:    + 43-732-2468-7134
 *
 * Compiler: Microsoft .NET Framework 1.1
 * */
using System.Windows.Forms;
using System.Drawing;

public class Test : Form {
	private LayoutManager.LayoutControl con;
	private LayoutManager.ILayoutManager layout;

	public Test() {
		Button btn1 = new Button();
		Button btn2 = new Button();

		layout = new LayoutManager.GridLayout(3, 4);

		con = new LayoutManager.LayoutControl(layout);
		con.Size = new Size(100, 100);
		con.Dock = DockStyle.Fill;
		con.BackColor = Color.Red;

		btn1.Text = "Test Button 1";
		btn1.BackColor = Color.LightBlue;
		con.Controls.Add(btn1);

		btn2.Text = "Test Button 2";
		btn2.BackColor = Color.LightGreen;
		((LayoutManager.GridLayout)layout).GoTo(2, 2);
		con.Controls.Add(btn2);

		this.Controls.Add(con);
	}

	public static void Main() {
		Application.Run(new Test());
	}
}
|
 |
 |
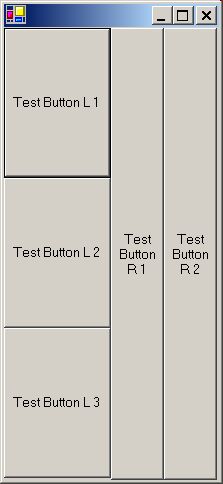
QLayout stands for queue/quick layout, because it lines up (queues) the given
controls either in one row (horizontal mode) or column (vertical mode) always equally
distributing the total amount of space between all controls. The controls will be added from left to right in
horizontal mode or from top to bottom in vertical mode. If you need advanced features use
the QConstrainedLayout.
Example:
| Source Code Download | Result | Resized Window |
/*
Copyright (c) 2003 Markus Loeberbauer

Permission is hereby granted, free of charge, to any person obtaining a copy
of this software and associated documentation files (the "Software"), to deal
in the Software without restriction, including without limitation the rights
to use, copy, modify, merge, publish, distribute, sublicense, and/or sell
copies of the Software, and to permit persons to whom the Software is
furnished to do so, subject to the following conditions:

The above copyright notice and this permission notice shall be included in
all copies or substantial portions of the Software.

THE SOFTWARE IS PROVIDED "AS IS", WITHOUT WARRANTY OF ANY KIND,
EXPRESS OR IMPLIED, INCLUDING BUT NOT LIMITED TO THE WARRANTIES
OF MERCHANTABILITY, FITNESS FOR A PARTICULAR PURPOSE AND NONINFRINGEMENT.
IN NO EVENT SHALL THE AUTHORS OR COPYRIGHT HOLDERS BE LIABLE FOR ANY CLAIM,
DAMAGES OR OTHER LIABILITY, WHETHER IN AN ACTION OF CONTRACT,
TORT OR OTHERWISE, ARISING FROM, OUT OF OR IN CONNECTION WITH THE SOFTWARE
OR THE USE OR OTHER DEALINGS IN THE SOFTWARE.
*/

/* Author:   Markus Loeberbauer
 * Homepage: http://www.ssw.uni-linz.ac.at/General/Staff/ML/
 * EMail:    Loeberbauer@ssw.jku.at
 * Phone:    + 43-732-2468-7134
 *
 * Compiler: Microsoft .NET Framework 1.1
 * */
using System.Windows.Forms;
using System.Drawing;

public class Test : Form {
	private LayoutManager.LayoutControl mainCon, leftCon, rightCon;

	public Test() {
		Button btnL1 = new Button();
		Button btnL2 = new Button();
		Button btnL3 = new Button();
		Button btnR1 = new Button();
		Button btnR2 = new Button();

		mainCon = new LayoutManager.LayoutControl(new LayoutManager.QLayout(LayoutManager.QLayout.Direction.Horizontal));
		mainCon.Dock = DockStyle.Fill;

		leftCon = new LayoutManager.LayoutControl(new LayoutManager.QLayout(LayoutManager.QLayout.Direction.Vertical));
		rightCon = new LayoutManager.LayoutControl(new LayoutManager.QLayout(LayoutManager.QLayout.Direction.Horizontal));

		mainCon.Controls.AddRange( new Control[]{ leftCon, rightCon } );

		btnL1.Text = "Test Button L 1";
		btnL2.Text = "Test Button L 2";
		btnL3.Text = "Test Button L 3";
		leftCon.Controls.AddRange ( new Control[]{ btnL1, btnL2, btnL3 } );

		btnR1.Text = "Test Button R 1";
		btnR2.Text = "Test Button R 2";
		rightCon.Controls.AddRange ( new Control[]{ btnR1, btnR2 } );

		this.Controls.Add(mainCon);
	}

	public static void Main() {
		Application.Run(new Test());
	}
}
|
 |
 |
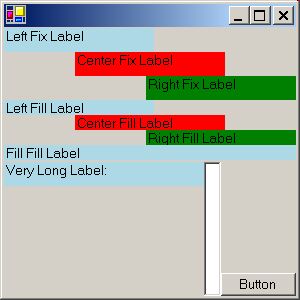
The QConstrainedLayout works like the QLayout but offers the possibility
to define constrains (the alignment) for every control you add to the layout control.
Use the method "SetAlign(Control, HAlign, VAlign);"
to set the alignment.
Possible alignments are:
| Horizontal Alignments | Vertical Alignments |
| HAlign.Left | VAlign.Top |
| HAlign.Center | VAlign.Center |
| HAlign.Right | VAlign.Bottom |
| HAlign.Fill | VAlign.Fill |
| HAlign.Fix | VAlign.Fix |
Use the alignments "Fill" and "Fix" in the managed dimension
and "Top", "Center", "Bottom", "Left", "Right" and "Fill" in the unmanaged dimension.
For example, if you are in horizontal mode
valid configurations would be:
SetAlign(c, HAling.Fix, VAling.Top);SetAlign(c, HAling.Fill, VAling.Center);SetAlign(c, HAling.Fix, VAling.Fill);
Invalid configurations in horizontal mode:
SetAlign(c, HAling.Right, VAling.Top);SetAlign(c, HAling.Fill, VAling.Fix);SetAlign(c, HAling.Left, VAling.Fill);
Example:
| Source Code Download | Result | Resized Window |
/*
Copyright (c) 2003 Markus Loeberbauer

Permission is hereby granted, free of charge, to any person obtaining a copy
of this software and associated documentation files (the "Software"), to deal
in the Software without restriction, including without limitation the rights
to use, copy, modify, merge, publish, distribute, sublicense, and/or sell
copies of the Software, and to permit persons to whom the Software is
furnished to do so, subject to the following conditions:

The above copyright notice and this permission notice shall be included in
all copies or substantial portions of the Software.

THE SOFTWARE IS PROVIDED "AS IS", WITHOUT WARRANTY OF ANY KIND,
EXPRESS OR IMPLIED, INCLUDING BUT NOT LIMITED TO THE WARRANTIES
OF MERCHANTABILITY, FITNESS FOR A PARTICULAR PURPOSE AND NONINFRINGEMENT.
IN NO EVENT SHALL THE AUTHORS OR COPYRIGHT HOLDERS BE LIABLE FOR ANY CLAIM,
DAMAGES OR OTHER LIABILITY, WHETHER IN AN ACTION OF CONTRACT,
TORT OR OTHERWISE, ARISING FROM, OUT OF OR IN CONNECTION WITH THE SOFTWARE
OR THE USE OR OTHER DEALINGS IN THE SOFTWARE.
*/

/* Author:   Markus Loeberbauer
 * Homepage: http://www.ssw.uni-linz.ac.at/General/Staff/ML/
 * EMail:    Loeberbauer@ssw.jku.at
 * Phone:    + 43-732-2468-7134
 *
 * Compiler: Microsoft .NET Framework 1.1
 * */
using System.Windows.Forms;
using System.Drawing;
using HAlign = LayoutManager.QConstrainedLayout.HAlign;
using VAlign = LayoutManager.QConstrainedLayout.VAlign;

public class Test : Form {

  public Test() {
    LayoutManager.QConstrainedLayout topLayout, bottomLayout;
    LayoutManager.LayoutControl mainCon, topCon, bottomCon;
    //
    // topCon
    //
    topLayout = new LayoutManager.QConstrainedLayout(
      LayoutManager.QConstrainedLayout.Direction.Vertical);
    topCon = new LayoutManager.LayoutControl(topLayout);
    Label lab1, lab2, lab3, lab4, lab5, lab6, lab7;
    lab1 = new Label();
    lab1.Text = "Left Fix Label";
    lab1.Size = new Size(150, 24);
    lab1.BackColor = Color.LightBlue;
    topLayout.SetAlign(lab1, HAlign.Left, VAlign.Fix);

    lab2 = new Label();
    lab2.Text = "Center Fix Label";
    lab2.Size = new Size(150, 24);
    lab2.BackColor = Color.Red;
    topLayout.SetAlign(lab2, HAlign.Center, VAlign.Fix);

    lab3 = new Label();
    lab3.Text = "Right Fix Label";
    lab3.Size = new Size(150, 24);
    lab3.BackColor = Color.Green;
    topLayout.SetAlign(lab3, HAlign.Right, VAlign.Fix);

    lab4 = new Label();
    lab4.Text = "Left Fill Label";
    lab4.Size = new Size(150, 24);
    lab4.BackColor = Color.LightBlue;
    topLayout.SetAlign(lab4, HAlign.Left, VAlign.Fill);

    lab5 = new Label();
    lab5.Text = "Center Fill Label";
    lab5.Size = new Size(150, 24);
    lab5.BackColor = Color.Red;
    topLayout.SetAlign(lab5, HAlign.Center, VAlign.Fill);

    lab6 = new Label();
    lab6.Text = "Right Fill Label";
    lab6.Size = new Size(150, 24);
    lab6.BackColor = Color.Green;
    topLayout.SetAlign(lab6, HAlign.Right, VAlign.Fill);

    lab7 = new Label();
    lab7.Text = "Fill Fill Label";
    lab7.BackColor = Color.LightBlue;

    topCon.Controls.AddRange(
      new Control[] { lab1, lab2, lab3, lab4, lab5, lab6, lab7 } );

    //
    // bottomCon
    //
    bottomLayout = new LayoutManager.QConstrainedLayout(
      LayoutManager.QConstrainedLayout.Direction.Horizontal);
    bottomCon = new LayoutManager.LayoutControl(bottomLayout);

    Label bottomLab;
    TextBox txt;
    Button btn;

    bottomLab           = new Label();
    bottomLab.Text      = "Very Long Label:";
    bottomLab.BackColor = Color.LightBlue;
    bottomLab.Bounds    = new Rectangle(0, 0, 200, 24);
    bottomLayout.SetAlign(bottomLab, HAlign.Fix, VAlign.Top);

    txt           = new TextBox();
    txt.Multiline = true;

    btn      = new Button();
    btn.Text = "Button";
    bottomLayout.SetAlign(btn, HAlign.Fix, VAlign.Bottom);

    bottomCon.Controls.AddRange( new Control[]{ bottomLab, txt, btn } );
    //
    // mainCon
    //
    mainCon = new LayoutManager.LayoutControl (
      new LayoutManager.QLayout(LayoutManager.QLayout.Direction.Vertical));
    mainCon.Controls.AddRange(new Control[] { topCon, bottomCon });
    mainCon.Dock = DockStyle.Fill;
    //
    // this
    //
    this.Controls.Add(mainCon);
  }

  public static void Main() {
    Application.Run(new Test());
  }
}
|
 |
 |
|
File
|
Description
|
|
ILayoutManager.cs
|
Interface of the layout manager.
|
|
LayoutControl.cs
|
Control which uses the layout managers.
|
|
FlowLayout.cs
|
Provides a simple left to right and top to bottom layout.
|
|
RubberLayout.cs
|
Provides a proportional layout, which means every control you add will keep its
position and size relative to the parent LayoutControl .
|
|
GridLayout.cs
|
Provides a grid layout. Simply specify the rows and columns, then add your controls
(the first control will be added in first column of the first row). The grid will be filled row by row.
|
|
QLayout.cs
|
QLayout stands for quick/queue layout. A layout which lines up (queue) the given controls,
always distributing the available space equally between all controls.
|
QConstrainedLayout.cs
QConstrainedSpace.cs
|
This layout works like the QLayout, with the additional possiblility to set constrains for the
"queued" controls.
QConstrainedSpace is a helper class to produce Controls, which can be used as spaces for the
QConstrainedLayout.
|
|
slm.zip
|
This ZIP file contains all files you need, plus samples for every layout manager, plus a batch file to
compile the layout manager and the samples.
|


|